

How To Repair Leather Furniture With Cat Scratches
There are 2 different types of cat harm that you lot can go on your leather furniture. The first is where the cat scratches the sides of the sofa, past plucking out the fibres/hairs from the leather. The second is where the cat will scratch the seating cushion causing a more than straight line scratch.
From the photos below, select what type of cat damage y'all have, so follow the correct guide on how to repair the scratches.
NOTE: These guides bear witness the all-time way to repair leather, to become a close to perfect repair. However, if you just want a quick fix solution to repairing cat scratches, then you should use the Leather Re-Coloring Balm. The balm will put the color back into the scratches blending them in with the rest of the sofa, simply it won't repair the roughness, it will just disguise them.
The advantages of using simply the lotion are; information technology is very piece of cake to do, quick, cheap and will greatly improve the await of the sofa. The disadvantages are, the scratches must be a lighter shade than the rest of the sofa for it to work.
Impairment TYPES
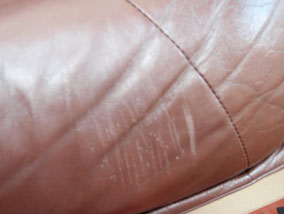
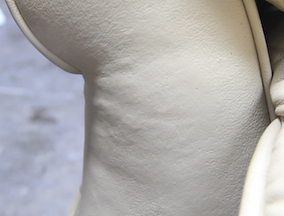
This photo shows cat scratches on the seating absorber. You lot can encounter that the scratches are only very calorie-free and have not damaged the leather itself, only lightly scratching the coating away. For damage like this, the Leather Re-Coloring Balm should be sufficient to restore the colour that has been scratched away and blend the scratches in with the surrounding leather.
If the damage looks like the photo to the left; read the instructions below on how to set it.
Products Required:
If the area of damage is larger than an area the size of a tennis ball:
- Leather Folder - To strengthen the area
- Leather Repair Kit - To fix the scratches
- Leather Colourant Kit - To restore the colour
Or if the expanse of harm is smaller than a tennis ball:
- Leather Folder
- Consummate Leather Repair Kit
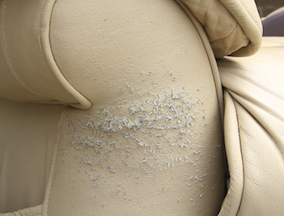
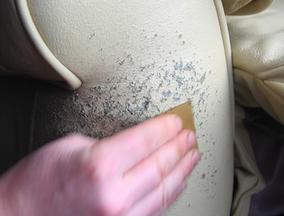
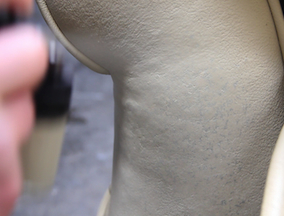
This type of true cat damage is caused by the true cat sticking it'south claws into the leather, when the cat pulls it'due south claws out, it draws out the fibres of the leather. This causes significant damage and the leather becomes rough and unsightly.
STEP Past STEP GUIDE: REPAIRING CAT SCRATCHES ON A LEATHER SOFA
PREPARE Area
As tin be seen in the prototype to the left, this leather armchair has suffered significant damage from true cat scratches to the left arm. Before attempting to repair true cat scratches on leather, it is important to thoroughly make clean the leather with Leather Cleaner to remove any dirt and grime. As this surface area of damage is larger than the expanse covered by a tennis brawl, we volition exist using the Leather Colorant Kit rather than the Leather Repair Touch Up Kit, but the same process can be used for both. If y'all are using the Leather Repair Touch Upwards Kit, simply employ a sponge in place of the Airbrush used in the subsequently stages of the guide.
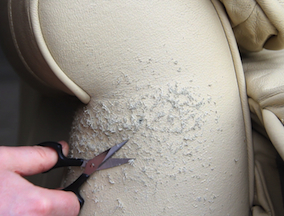
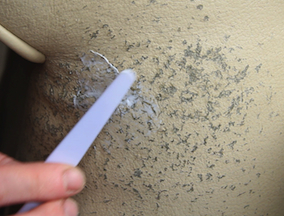
Footstep 1: TRIM ANY LOOSE FIBRES
After cleaning the expanse, take a pair of sharp scissors and trim any loose fibres, often establish with damage from cat scratches. Delight note that only the longer fibres need to be removed at this stage. Any shorter fibres that remain volition non affect the quality of the repair or the wait and feel of the cease result. Take care at this stage not to puncture, cut or cause further damage to the leather.
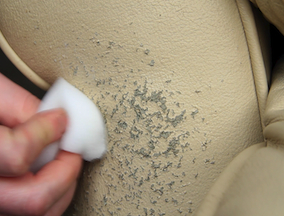
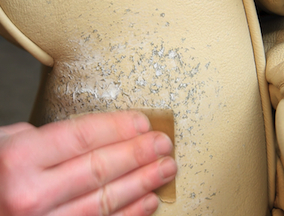
STEP 2: Use LEATHER BINDER
When you take trimmed the longer loose fibres, the next footstep is to use the Leather Binder. To apply the Leather Binder, simply apply a small amount to a sponge and use this to rub directly into the area of impairment. Coat the entire expanse and allow to dry. In order to ensure a strong, durable repair, apply viii-ten coats of Leather Binder, assuasive sufficient time for the previous glaze to dry before applying the adjacent.
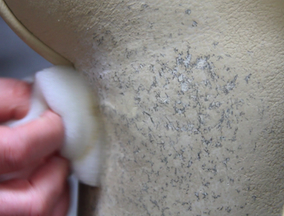
STEP 3: SAND THE Expanse DOWN
In one case the folder has been practical, the area should be sanded downwards in society to create a shine, even surface on which to perform the remaining steps of the repair. To practice this, simply accept a slice of fine sandpaper (1200 dust is sufficient for this job) and lightly sand the entire surface area that the Leather Binder was applied to.
STEP 4: Use THE HEAVY FILLER
Before budgeted this step, ensure that the expanse is free from any residue from sanding. Then, using the Heavy Filler and palette pocketknife, spread a thin layer of filler over the scratches. Get out for 20-25 minutes to dry and apply boosted layers if required, you should aim to have the holes, scratches and gouges filled so that they are level with the surface of the leather.
STEP 5: SAND AREA Down
Later applying the filler, it should be sanded down, once more, 1200 grit sandpaper is sufficient for this chore. After sanding, wipe the leather downwards with the alcohol cleaner to remove and dirt and residuum from the leather'due south surface. This ensures proper adhesion of color when we come to apply it in subsequently stages.
Footstep 6: APPLY 1ST COAT OF COLORANT
Once the booze cleaner has had time to dry out, it is time for the colorant to be applied. Start off past applying the first coat of colour past sponge. Simply pour a small corporeality onto a sponge and use this to use a thin glaze to the leather. Sometimes afterwards applying the colorant, it emphasises some of the scratches you lot though were 'healed'. Simply employ more filler, sand down and re-utilize the colourant as before.
Pace 7: SPRAY ON COLORANT
After the starting time coat of colorant has been practical, if using the colorant kit; y'all should apply the airbrush to begin building upward the colorant in a series of thin layers, leaving time for the previous coat to dry earlier applying the next. If using the Leather Repair Kit, successive layers should exist applied using the sponge. Use every bit many thin layers as required to sufficiently blend with the surrounding area and conceal the repair
STEP 8: Employ Cease
Once you have a adept coverage of color, either by sponge or airbrush, the next step is to apply the lacquer onto the leather to seal the color in. Accept the glossy Super Seal and use using a sponge or airbrush, in three-4 layers. This forms the basis for a flexible and very robust finish. After this is done, apply the Leather Stop, using the contents provided in 4-v layers. For both products, allow fourth dimension for each coat to completely dry before applying the next.
Past following these steps and using the products in this guide, yous can achieve professional results when repairing cat scratches on all items of leather, with relatively little time, effort or toll.
-
Leather Binder
Thin liquid used to strengthen heavily worn & cracked leather.
From $17.95
- Soaks deep into fibres
- Repairs modest scuffs
- Extremely flexible
- Helps restore heavy cracking
View Product

How To Repair Leather Furniture With Cat Scratches,
Source: https://www.furnitureclinic.com/e-learning/2019/05/23/how-to-repair-cat-scratches-on-leather/
Posted by: jonesvardert.blogspot.com
0 Response to "How To Repair Leather Furniture With Cat Scratches"
Post a Comment