

How To Repair Btrfs Parent Transid Failed
Parent Transid Verify Failed [edit | edit source]

Branch of a maple tree with leaves and seeds
Parent Transid Verify Failed is perchance the well-nigh dreaded error in Btrfs. It is oftentimes not possible to fix this error and yous should look over your backups.
[ 4007.489730] BTRFS mistake (device vdb): parent transid verify failed on 30736384 wanted 10 plant 8
Why does transid errors happen? [edit | edit source]
Btrfs stores its metadata in a tree-like construction chosen b-trees. At that place are the several FS trees, the Extent tree, Root tree, Clamper tree, Checksum tree and Device tree.
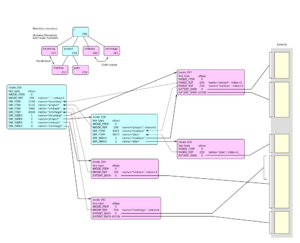
Illustrating the relationships between the different sets of keys (grouped here by inode number) in a subvolume
Re-create-on-Write (Moo-cow) means that a inverse cake of data is stored in a new extent, then the metadata is updated to point to the new extent. This way, if in that location is a crash or ability-outage, either all the new data available, or the old information remain intact.
If we imagine a fs-tree as a virtual tree with a root, branches and leaves, it is easier to understand how tree updates happen:
- When a some data is updated, Cow ensures that the update is written to a new extent, leaving the old data intact.
- A new leaf is created pointing to the new information
- A branch is created pointing to the new leaf
- The root is updated to point to the new co-operative
If there is a crash or power-outage before the root is updated, the root volition still bespeak to the old branch and the old leaves, and your sometime data remain intact.
Each part of the tree stores the transaction counter. What the Parent Transid Verify Failed means is that a leaf is pointing to an older branch (parent). This should normally not be possible because and it ways that a central part of Btrfs is broken.
Linux uses Affluent/FUA (previously known every bit barriers) every bit a way to ensure that no boosted information is written to disk before before the Flush/FUA is acknowledged. This is very important because storage devices can re-guild writes in their write cache to optimise operation, and if some problem happens such a bus/device reset, power-loss, etc, the data on-disk could end upward in an unordered country, leading to an inconsistent filesystem.
So, when there is a Parent Transid Verify Failed, it oft ways that the storage was not honouring the Flush/FUA as it should!
Some other situations that can pb to transid errors are:
- Logical bugs: The filesystem structures haven't been properly updated and stored correctly.
- Misdirected writes: the underlying storage does not store the data to the exact address every bit expected and overwrites some other information.
- Block storage device (hardware or emulated) does not properly affluent and persist data between transactions so they get mixed upwardly.
- Lost writes without proper fault treatment: writing the cake worked as viewed on the filesystem layer, only there was a trouble on the lower layers not propagated up.
Repairing the filesystem [edit | edit source]
Practise not effort to repair the filesystem yourself, but seek advice from the developers at the #btrfs IRC channel or the Btrfs mailing listing. In that location are advanced mount options such as -o usebackuproot and -o rescue=... that tin can assist in recovery, but exercise not attempt to utilise them without consulting with experienced admins starting time.
It is normally non possible to make repairs and go back to a fully working land. If you can mountain the filesystem as read-only, use this opportunity to make backups of your files. If information technology is non possible to mount the filesystem as read-only, then btrfs restore is a terminal option. Btrfs restore can ignore errors and re-create the files from an unmounted filesystem to another device.
Preventing Parent Transid Verify Failed [edit | edit source]
If the device is lying nigh it'southward capability to back up barriers, there is no way for Linux to know when the information is really on-disk. Information technology s therefore very difficult to fully mitigate the gamble. If your device is in a USB encloure, try switching to some other enclosure or fit it directly on the SATA double-decker. Information technology is relatively common that USB-SATA bridges used in enclosures do not implement all ATA features, don't have skillful error handling or but lie about the device capabilities. A personal feel of this was a USB enclosure that didn't implement the USB Attached SCSI (UAS) protocol properly and lost writes during heavy load. Disabling the UAS kernel module helped in that example.
Disabling write cache is one possible mitigation of the trouble. It slightly reduces functioning, just information technology should prevent write cache reordering. Utilise hdparm to disable write cache.
hdparm -i is used to become bulldoze information:
# hdparm -i /dev/sda
/dev/sda: Model=SAMSUNG SSD 830 Serial, FwRev=CXM03B1Q, SerialNo=S0Z4NEAC325687 Config={ Fixed } RawCHS=16383/sixteen/63, TrkSize=0, SectSize=0, ECCbytes=0 BuffType=unknown, BuffSize=unknown, MaxMultSect=sixteen, MultSect=16 CurCHS=16383/16/63, CurSects=16514064, LBA=yep, LBAsects=500118192 IORDY=on/off, tPIO={min:120,w/IORDY:120}, tDMA={min:120,rec:120} PIO modes: pio0 pio1 pio2 pio3 pio4 DMA modes: mdma0 mdma1 mdma2 UDMA modes: udma0 udma1 udma2 udma3 udma4 udma5 *udma6 AdvancedPM=no WriteCache=enabled Drive conforms to: unknown: ATA/ATAPI-2,3,four,5,six,7 * signifies the electric current active fashion hdparm -W 0 is used to disable write cache while hdparm -W 1 enables write cache:
# hdparm -W 0 /dev/sda
/dev/sda: setting drive write-caching to 0 (off) write-caching = 0 (off)
# hdparm -i /dev/sda
/dev/sda: Model=SAMSUNG SSD 830 Series, FwRev=CXM03B1Q, SerialNo=S0Z4NEAC325687 Config={ Fixed } RawCHS=16383/16/63, TrkSize=0, SectSize=0, ECCbytes=0 BuffType=unknown, BuffSize=unknown, MaxMultSect=16, MultSect=16 CurCHS=16383/16/63, CurSects=16514064, LBA=yeah, LBAsects=500118192 IORDY=on/off, tPIO={min:120,w/IORDY:120}, tDMA={min:120,rec:120} PIO modes: pio0 pio1 pio2 pio3 pio4 DMA modes: mdma0 mdma1 mdma2 UDMA modes: udma0 udma1 udma2 udma3 udma4 udma5 *udma6 AdvancedPM=no WriteCache=disabled Drive conforms to: unknown: ATA/ATAPI-two,3,four,five,6,7 * signifies the electric current active mode The write cache on NVME drives can be disabled using nvme set-feature -f 6 -v 0 -s.
Another pick is smartctl --set wcache,off.
Write cache has to exist disabled on each boot and on each resume from append or hibernation.
The Arch Wiki has a adept write-up on how to use hdparm and make its settings persistent across reboot.

How To Repair Btrfs Parent Transid Failed,
Source: https://wiki.tnonline.net/w/Btrfs/Parent_Transid_Verify_Failed
Posted by: jonesvardert.blogspot.com
0 Response to "How To Repair Btrfs Parent Transid Failed"
Post a Comment